Wednesday, July 24, 2013

Flower Tee ~ Jalie 2805 ~ Mastered!

Monday I attempted Jalie 2805; a lovely t-shirt pattern with multiple options.  In a nutshell I went up one size for K from an L that she measured at to a M; It didn't fit so well. Today I tried again, this time bumping up four sizes from her measurements to an O which is a size 11US or 150cm.  This fits her much better.


I went with View A with cap sleeves. The instructions are wonderful on these patterns and I love that they include sizes from a girls 2 all the way up to a woman's 22 (US sizes).  This pattern also has a choice of 4 different sleeve lengths: cap, short, 3/4s, and long.  It also has 4 different necklines: Jewel neck, mock turtleneck, v-neck, and overlapped v-neck with buttons.  That is a lot of options!

Double needle on the bottom hem and sleeve hems. 

Sewed down seam allowances on neck and sleeve caps.  
Also added a strip of twill tape to shoulders to stabilize. 

She's very happy with it.  (Photo bombed by the pooch)


Nice long length.  Sleeve length is great too. 

Now that I've mastered the fit on Miss K I see many of these comfy tees in her future, which is perfect because she wears tees to school on most days.

I look forward to making some for myself too!

Fabric: used 1/2 yard of 58" wide Jersey Knit "Floral Fuchsia/Blue/White; Purchased for $2.97 way back on 06/01/2012 from fabric.com ($5.94/yard);
65% poly, 35% rayon blend. It is very soft and lightweight.  30% stretch. I have 1/2 yard left that I will use to master the underwear pattern Jalie 3242

~ Happy Sewing! ~ Kristin ~

Monday, July 22, 2013

Jalie #2805 ~ Tshirt for Miss K

Testing out Jalie pattern #2805 today.  I measured Miss K right before starting.  Her measurements put her exactly in a size 8US, 135cm, or "L" in Jalie sizes.  I've read a few places that they can run slim and K is not slim; she is a solid little pumpkin.  Plus when I made the undies they were tight on her.  So I bumped up to a size 9US, 142cm, or "M" in Jalie.

The instructions on this pattern are superb!  I enjoyed sewing it and took my time.  The pattern produces a really cute top that looks nice.  I finished it up and it was too small. :-)  The neck opening is tight to get on and the sleeves are really snug.  K wore it for about an hour and then complained about the sleeves.


Ok, back to the drawing board.  I'll try to bump up to an 11US, 150cm, or "O" in Jalie. I'll let you know how that goes.

Fabric: Used only 1/2 yard of $2.97 Jersey Knit Bunny Bakers White/Multi 65% cotton, 35% poly - 58" width.

 ~ Happy Sewing! ~ Kristin ~

Sunday, July 21, 2013

2 Nightgowns ~ Kwik Sew K3105

It is so hard to find a nightgown pattern for girls!  I've been looking for a great one for awhile.  I came across Kwik Sew K3105 and decided to give it a go.  After reading the positive reviews about it on patternreview.com; I plunged in and cut both fabrics without a "test" run.  Ugh. Will I ever learn?


I chose to sew View B mainly because I only had 2 yards of fabric for each nightgown.  The pattern calls for 2 1/8 yards for View B in the size L (10) that I traced and cut.  K is growing out of her 8's so I went with a 10 so the nightgowns would last hopefully through the winter.  View B has lace around the neck, armholes, and bottom - I did not use any because K would complain of scratchiness.


I followed instructions for View B up through #5.  I used my serger to do the gathers on the bottom ruffles and attached each one separately without sewing up the sides. On the pink squirrel and tree fabric I folded the neckline and armhole edges over and then over again in a tiny 1/4" to hem.  Then I sewed up the sides and hemmed the ruffle.  I'm telling you this ruffle seemed to go on for-ever-and-ever-and-ever.  I also had to use green for the ruffle because I couldn't fit the band within the 2 yards of fabric I had.
This is where I tried it on K and learned that the armholes were HUGE and the neck LOW.  Plus the neck barely fits over K's head.  In the future I'll opt to do the yoke for View A which has a closure in back.


To salvage the bug nightgown I opted to add yellow flannel bias to the armholes which helped a lot. K didn't want any on the neck but I think I'll add it anyway.  The top has a tendency to pull forward and drag the neck scandalously low.  I also didn't want to hem the bottom ruffle again so I made a small band (3" which after 1/2 inch seam and folded in half was 1") for the bottom.  I sewed it around and then top stitched the seams up onto the ruffle.  I'm not sure this was a good idea because it seems to weigh down the ruffles and make the bottom stiffer.  I'm hoping it loosens more in the wash (fabric was already pre-washed but I'm hoping it softens even more).  


FABRIC:
 "Comfy Flannel Bug Stripe Pink" 100% cotton, 2 yards $6.72 (08/22/2012) +  "Flannel Quilter's Suede Buttercup" 1/2 yard $2.54 (04/15/2012). TOTAL: $9.26

"Mother Nature Flannel Forest Friends Girl Pink" 100% cotton, 2 yards $10.17 (05/22/2012) + "Comfy Double Napped Flannel Lime" 1/2 yard $2.54 (06/05/2012) TOTAL: $12.71


Overall: I do like the look of the nightgown.  The pattern is easy to make and follow.  I suggest getting the full 2 1/8  yards that the pattern calls for in order to fit everything on.  I'm sure I'll make it someday in the future but for now, 2 is enough. Now I just need to add the yellow bias to the bug one and add green bias to the armholes and neck of the squirrel one.

Wondering what that green thing is in my pictures?  It is supposed to be a shoe holder, lol.  I think it works wonderful for holding notions - ribbons, bias tape, zippers, etc.  I used the command strip hooks to hang it on the closet door.
 "Betty" is in the bottom left picture (above).  She needs some fitting work that I haven't gotten to yet.  I also re-purposed an old spice rack, bottom right picture (above).  Love that I can keep some of my vintage buttons in it.  I placed K on this job but she grew tired of sorting buttons.  I'll have to finish it up later.  The colors are so cheerful!

And this is my messy station. I should really clean it up.  To the right is the dresser and many baskets/boxes filled with fabric. To the left is my ironing board.  Nala puppy lays right in front of my machine on the animal print there..... :-)


~ Happy Sewing! ~ Kristin ~

Friday, July 19, 2013

Long PJ pants and Fuzzy Shorts, Ottobre 06/2011 #37

Seems like deja vu around here again. I've returned to one of my favorite, ultra versatile patterns: Ottobre 06/2011 #37.

Other times I've used this pattern:
Altered to shorts with piped pockets Jun 2013
Terry Cloth pj shorts Feb 2013
Space pj shorts with mock fly Jan 2013
Blue gingham shorts with mock fly Jan 2013

This pattern is for pajama shorts; however, this time I've altered them again in a different way.

Up first: Long PJ pants with elastic waist and drawstring.
Mr. T is hitting a growing spurt and finally needed some pajama pants.  This kid never seems to have a shirt on for bedtime and could sweat in the winter.  I wanted to make him something that would be cool and comfortable but last through the winter.


I took the shorts front and back pattern pieces and measured out T's inseam +1 inch from the crotch point of each piece (front and back).  Then I extended the legs down to this measurement.  It wasn't hard at all.  I also added the waistband to the top of each pattern piece instead of having it a separate waistband. I eliminated the mock fly.


Next I sewed them the same as I would for the shorts.  I added buttonholes 1 1/4 inches down from the waistband on each side on the front for the drawstring to come out.  I folded the fabric 1/4 down and pressed (on the waistband) and then attached the elastic in the round with a zigzag stitch.  Next I flipped the waistband down and sewed with a straight stitch all the way around creating the elastic waistband and the casing for the drawstring all in one.  I made bias strips and used my 1" clover bias tape maker to make the drawstring (sewing down each side when finished).  After all this I fed the drawstring through the elastic casing on the pants and hemmed the legs.


I also added a little pocket to the back of these.
Overall sewing time was probably 45 min. I was very happy to use up this fabric in my stash.
Fabric: This project took the full 2 yards I had. It is Pet Park Blue Hamsters Having Fun by Caleb Gray Studio for Robert Kaufman Designs.  I picked it up in 2012 for $6.10/yard so total cost was $12.20.


Next up: flannel PJ shorts.
Nothing much to say here because I've made them many times.  The fit is wonderful and the length is perfect.  I added the waistband to the front and back pieces because I didn't want a separate band. I eliminated the mock fly also.


I sewed these up in 1/2 hour.  I used the same waistband elastic method as I did for the pants: Fold down fabric 1/4 inch on waistband; attach elastic in the round with a zigzag stitch; fold it over again and this time I zigzag stitched the waistband part.


This was a fabric that has long sat in my stash.
Fabric: 1.5 yards of flannel purchased at Hancock's long ago. I don't even know how much I paid sadly.

It is so nice to have a TNT pattern for Mr. T.  And now I'm off to work on some nightgowns and a dress for Miss K!


~ Happy Sewing! ~ Kristin ~

Monday, July 15, 2013

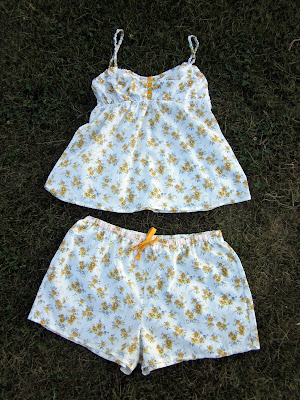
Ottobre Woman 05/2011 #1 Sunday Morning & #2 Sweet Dreams

I've slowly been conquering my "to-do" list one thing at a time.
Yesterday I looked at a pile of fabric in my sewing room and spied a lovely lightweight, semi-sheer cotton with cute yellow flowers.  I instantly knew what I wanted to make with it.

These are the first two Woman's patterns I've traced and sewn from my Ottobre magazine stash.  I guess I'm testing the waters on sizing with these two.


# 2 Sweet Dreams
My measurements put me in a size 44 for the bottoms so I traced and cut that size.
These shorts have an elastic waist and a drawstring.  As I was sewing I was a bit nervous because the rise looked very large.  I like things to sit waaaay below my waist. Nonetheless I put them together as stated.


I followed the instructions to the tee.  Every step was laid out nicely.
I opted to put fusible interfacing over the drawstring buttonholes even though the pattern called for fabric there.  I serged all edges.  I didn't add picot-edged elastic to the leg holes because it would bother me; plus I'm really not one for frills (now I know where my daughter gets it from).  I used pre-packaged bias tape for the drawstring because it saved time.


After I finished I tried the shorts on and the rise is very high for me.  Next time I'd lower the waist by a full 1-1.5 inches; these sit about an inch below my waist. They are also pretty big on me.  I think I may need to go down to a 42 next time.  I usually wear a size 10 in RTW.

I like the shorts and they will be comfy for bedtime so it's a win.

# 1 Sunday Morning
My measurements put me in a size 40 for the top so that is the size I traced and cut.
Most of these pattern pieces are cut on the fold with exception to the straps and button band. It is a bit of a fabric hog because of this.
My fabric is semi-sheer so I added a nice light cotton lining to the bust area.


I also followed the instructions for this tank and they were well written.  I used a small bit of the pre-packaged bias tape for the button band to match the shorts drawstring. At first I wasn't sure what length I needed to gather the center bust band too, however I soon realized I was fitting the button band into that spot.  Next time I'll most likely use some elastic tape so it is a nicer gather.


I forgot about the underbust elastic and casing made with the seam allowances when I serged those seams.... It made for a very tight elastic casing but I made it work.  I didn't want any picot-edged elastic on the tank either so I used 1/4 inch elastic and attached it as I would for a swim suit, or underwear - zigzaged the elastic on while stretching and then flip and zigzag again.  I had to make sure I created more stretching on top of the bust cups because the pattern states to extra stretch here to "create shape for the bust."


At this point I tried on the tank and realized the bust part was way to big for me... :-( boo They were both big width-wise and height-wise.  I tapered 1/2 inch off each of the sides and then flipped the top elastic down again.   It works now even though it is slightly big still.  Next time I'll have to try a size 38 - I usually wear an XS to a S in RTW tops.


I sized the straps according to the pattern instructions and added cute little vintage buttons from my stash.

Overall I'm pleased with both and most likely will attempt these patterns again in different sizes.

Fabric: Picked up from Hancock's Sept 15th, 2012; It is a beautiful Ivory and has yellow flowers.  Very lightweight and semi-sheer.  I grabbed it because it looked so "vintage" to me.  They only had 2.5 yards left so I snatched them all up at $1.19/yard; I used pretty much all of it so my pajama outfit cost me $2.98 total. LOL that ROCKS!

~ Happy Sewing! ~ Kristin ~

Sunday, July 14, 2013

Ottobre 03/2012 #34 as a Nightgown

I loved the yellow summery dress I made yesterday from this pattern and I had to try it as a nightgown.  Ottobre 03/2012 #34 Jungle Stripes dress.  Also, Miss K completed her first project and that is how I tricked her into modeling the nightgown ;-)

This pattern is a dream and works well for a nightgown as well as a dress. It has an elastic neckline and sleeves for a peasant dress feel.  This fabric was notably more stretchy and thin so it was a little harder to work with.  Once I attached my walking foot everything went smoothly.
This fabric was actually part of my very first fabric.com order back on Jan 23, 2012. Thermal Knit Apples Pink/Red.  I used 1.50 yards, $4.05 total.


Miss K made her pillow mostly by herself.  I cut the fabric with my rotary blade (she is not allowed to touch that scary thing) and assisted with the zipper but she did all the actual sewing.  She is so proud of herself and so am I :)  She made it just like in my tutorial.


The fabric has a bit of a stretch.  I'm thinking a cotton sateen with lycra?  It has a nice sheen.  My mom had it leftover from a summer dress and she likes to give me her leftovers, lol.


~ Happy Sewing! ~ Kristin ~

Saturday, July 13, 2013

Ottobre 03/2012 #34 Jungle Stripes Dress and Jalie 3242

Miss K was gone with grandma all day Friday and today so I thought I'd surprise her with a new dress.  She is on this kick lately of only wanting to wear dresses day and night.  I also wanted an easy project.

Enter Ottobre 03/2012 #34 Jungle Stripes Dress

This dress has been on my "to-do" list for a long time now.  I traced and cut a size 146 for K who wears an 8 in RTW.  There are only 4 pieces for this pattern: the front, back, sleeves, and pocket.


Everything went together extremely well. I followed the instructions exactly and had no problems.  Everything with this dress is straightforward and nothing is complicated.  I used my double needle to hem the neckline, sleeve hems, and bottom hem.  I used my wonder tape to ensure no funky waviness would occur.


There is elastic in the sleeve bottoms and elastic in the neck and sleeve tops.  The neckline is like a peasant top.  The pleats I did backwards accidentally but no one should notice.  K doesn't and that is all that matters to me!


It took me 2 short hours to sew up and I love the results.  This pattern is a winner in my book!


Fabric: ordered back in Feb. from The Fabric Fairy.  It is a dream to work with.  A nice stable knit.
"Colorful Umbrellas Cotton Knit" 1 yard of 60" wide for $7.19

Jalie 3242
I also tested out a new pattern to my collection Jalie 3242.  Cute matching underwear for K's dress above.  According to the size chart I went with a 10 yr old or letter N.

The instructions are very detailed and wonderfully supplemented with pictures.  They took maybe 1/2 hour to sew up and were so cute!  Problem is.... they are waaaaaaaaay to tight.  I'll have to try again with a bigger size.  Also, the pattern states to use 75% stretch and I know my knit is a ton less stretchy.  I still have enough to etch out two more pairs of undies with the same fabric so I'll try again.  Either way they are so cute!

K thought they were swim bottoms and my husband about died of confusion and laughter when he walked in.  "Why are you making underwear?" LOL.  He's a nut.


~ Happy Sewing! ~ Kristin ~