Sunday, August 30, 2020

Burda Style Top and Skirt (03/2017 #124 and 01/2009 #125)

Often I have spur of the moment thoughts about what I want to make. The fabric “speaks to me” or an outfit pops up in my mind – it gets stuck in my head, and I just have to make it. This outfit is one I envisioned and hoped it would come to light just as I dreamed up.

Let’s start with the skirt.

IMG_0300 Pattern: BurdaStyle 03/2017 #124 Maxi Skirt with Side slits

Magazine description:  “A perfect last-minute piece! The skirt with slits along both sides has a casing at the waistline and contrasting coloured cord to draw it together. It is a comfortable choice for styling with many options.  And, it works with sneakers, too.”

IMG_0302

Date Sewn: 08/28/2020

My measurements at the time: 31 waist, 45.5 hip

IMG_0310

Size used: straight 48

Alterations: I used a 69” long drawstring instead of the 74” the pattern called for. I ended up with 34” long of the 1.5” wide elastic in the waist.  I could tighten it by an inch or so next time.

IMG_0298

The pattern stated to add 1&5/8 “ to the hem but the skirt was so very long when I tried it on.  I ended up taking 2” off the hem and then folded up 1” and up 1” again to make the hem.  (The pattern states to turn 1” hem to the inside and then turn the edges under to half allowance width before stitching in place). So in all I took 3” total off what the magazine said for the hem length.  For reference, I am 5’7” tall.

IMG_0301

Instructions:  They were actually good.  I had no issue following them or understanding what was asked to sew.

Fabric: 3 yards of a precut from FabricMart.  It says 100% cotton in the description but it is clearly made with some, if not all, polyester. It made that snapping sound under my needle, frayed like crazy, and just feels like polyester.  Pattern calls for 2.5 yards of fabric and I guess that could just barely work; I used the 3 yards I had and there was very little left over.  Black/White Swallow Polka dot print sateen shirting 100% cotton, is the description. I purchased it in Feb 2019 for $4.80 TOTAL so $1.60/yard? (The dots are actually tiny birds!).

close up of “dots”

20200830_150316 IMG_0306

Thoughts: This looks like such a simple skirt from the picture, but you have hip pockets, a drawstring to add, and awesome self facing slits on both sides of the skirt.  It took a bit longer to sew than I expected but it was enjoyable.  Everything came together nicely and all the pieces matched up perfectly. I would love to try to make it in a Challis like as the magazine suggests.

burda 03.2017 124

I made this skirt to go with the shirt below but I don’t like how they pair up after all.  So now I need to figure out what sort of shirt to wear with this skirt. I like the skirt and I can see myself wearing it often – I especially love those slits in both sides; however, the waist is a bit too big and I don’t know where it sits best on me – lower on my hips or at my actual waist.  Here are some pics of the two together.

IMG_0288IMG_0291IMG_0293

And now for the top.

IMG_0282 Pattern: Burda 01/2009 #125 “polo shirt” (I just have to say, the magazine calls this a polo shirt, maybe because of the placket? But to me a polo shirt has to have a collar as well, this to me is a t-shirt) IMG_0281

Magazine description:   “The fine jersey knit is pleasant to wear and lends this little top with polo fastening and short, puffed raglan sleeves a sporty look. And nothing can go wrong if you follow our illustrated sewing course in the sewing supplement.”

Date Sewn: 08/28/2020

IMG_0277

My measurements at the time: High Bust 37, bust 39, waist 31, hip 45.5

Size used: I had to do some grading out on this top.  The magazine only goes 36-42 and I am a 44 bust/waist and 48 hip in Burda.  So I graded the pattern out to the 44 bust/waist and 48 hip. It wasn’t very hard to grade out these sizes as the pattern pieces are very straight forward.

IMG_0273

Alterations: This pattern had you add 1.25” for the hem allowance but this shirt was crazy long on me.  I have sewn a decent amount of Burda patterns now and I don’t remember other ones being so long.  I took 2” off the hem and sewed a 1” hem.  In the future, I don’t need to add the hem allowance on this pattern.  After I was all finished it was too big in the bust so I went back and took it in from the sleeves/underarms/ through the bust and graded back out to 0 at the waist. This made the shirt sizing 42 for the sleeves/bust, 44 for the waist, and 48 for the hip.

IMG_0228

Instructions:  This pattern is actually the “sewing course” for this issue.  I had no problems with the instructions.  Even with the placket, everything was explained well and there are great pictures for each step.

IMG_0272

Fabric: At first I thought this was a wine colored double brushed poly from my stash, but it was an absolute bear to work with.  I sew with dbp all the time and have no trouble so I got really frustrated.  This fabric would not cooperate no matter what I tried.  I had to walk away from sewing this top for 2 days to settle my frustrations.  When I came back to the top, it finished up nicely.  I then looked at my fabric database and see it is a modal jersey.  It is soft and brushed like dbp, but much thinner, more fluid – refuses to hold an iron press.  I don’t think the placket lays well at the bottom because the fabric is so thin.  I love this top design, but I honestly despise this fabric.  I will remake it in a nicer jersey knit sometime.  Anyway, I used “cranberry knit activewear” modal/lycra jersey that I purchased from LDG textiles going out of business sale, in Aug 2019, for $2 for the yard.

burda 01.2009 125

Thoughts: I love the design.  The gathered neck and sleeve edges make for interesting details – they make this no ordinary t-shirt.  I actually do like how the placket looks in this design too – with proper fabric. Even though I dislike this fabric, once I put the top on it was so soft and comfortable that I just didn’t take it off! I made it to go with the above skirt, but I really don’t like the two together.   I like the placket and spent the time making the button holes all proper, attaching the buttons.  And then I realized when I was all done that I didn’t need to actually open the buttons to get the shirt on or off.  So if you make this, you can just sew the buttons right down over those button holes if you wanted to save time.  The magazine says to use snaps but I didn’t have any that matched so I went with real buttons. This top will go with many of my pants and shorts in my wardrobe though so it will get lots of wear.

20200826_181354

I was taking my blog pictures like normal and Miss K decided to come in and make fun of me. After a bit of banter it turns out she wants to be my photographer.  So today’s pics are courtesy of Miss K. Here is my “what do you want?” pose.

Also, I dyed my hair this reddish color this month – for fall, because I was bored, and because I used to dye my hair all the time but haven’t in like 2 or 3 years.  I’m not sure if I like it or not.  I am a “cool” coloring and I think this shade might be too “warm” for me.  Oh well. It isn’t like I’m going anywhere!

IMG_0251

Thanks for reading!

Kristin

Monday, August 17, 2020

McCall’s M7061 Pajama set ~ Sewing Plans

Pattern: McCall’s M7061 Pajama set IMG_9846 These were part of my Fall/Winter sewing plans for 2019

Date Sewn: 08/16/20

Fabric: Baum Textiles WinterFleece Classic Plaid Red/Black Yard, purchased on Amazon in Sept 2017 for $7.58/yard.  I used all 4 yards for this set so the total was $30.32.  The pattern calls for 2 yards for the top and 2 yards for the bottoms in my size. I have some scraps left over that Miss K says I need to use for dog coats.  I can’t wait to match my fur babies, should be exciting.

Let’s Start with the Top

IMG_9834

My measurements at the time: High Bust 36, Bust 39, Waist 32, Hip 46

Size used: Top L bust/waist, XL sleeve and hip, View A.

IMG_9839

Alterations: 1/2” forward shoulder adjustment (standard for me).

The finished measurements for the bicep are wrong.  The large size states its 14” but it is not, it is only 13.5”.  That 1/2” really does matter.  My bicep measures 13” and I wanted more than the 1/2” ease so I went with the XL size that has a finished measurement of 14.5” (not 15” like the pattern states).  I could should have done a full bicep adjustment to the L size, but I was lazy and just used the XL size.  This added the 1” ease I needed for my arms to be comfortable, but also made more ease to fit into that armscye.

The hood is enormous!  Like very very large.  I compared it to my Jalie 3355 hood, that is much smaller and preferred.

20200813_173331

The differences were huge.  I decided to reduce the size of the hood by 1” on all sides except for the bottom.  In turn, this meant I needed to raise the neckline of the top by 2” which I liked better anyway because I don’t like seeing a hood seam so far down on the bodice. It worked out perfectly and the hood attached with no issues.

IMG_9841

And now for the pants

IMG_9852

My measurements at the time: Waist 32, Hip 46

Size used: Pants in XL, View F.

IMG_9851

Alterations: 1/2” knock knee alteration where you slide the inseam in by the 1/2” from knee to ankle and then blend up to the crotch point on the inseam and take in on the outseam ankle to knee, blending up to hip. I scooped the butt curve by 3/4” by comparing the crotch curve to my almost perfect Burda pants.  I measured the back crotch curve and it was only 11.75” and I knew I needed 15” for my butt.  So I added 2” by slashing and spreading the crotch curve at hip line.  Then I added an additional 1.5” to the top of the center back, tapering to 0” at side seam.  In the front I needed to lower the center front rise by 2” because I like my pants to be under my stomach (due to health issues). I was happy to see the back pant piece had the crotch line added to the pattern.  It is an easy line to find on my own but I enjoyed not having to do it; though I am not sure why they did not also add it to the front piece. For the pants I added 36” of 1.5” wide elastic to the waistband of the pants. I can’t believe the pattern does not have you add elastic to the waist!  The ankle cuffs (which they call leg bands) are very, very tight to attach; I was stretching them to the max.  Also, the pants are about 1-1.5” too short for me so next time I need to add to the hem.

IMG_9850

Here is how I do the knock knee adjustment. It seems to help quite a bit with wrinkles in the back legs and under butt.

20191230_095523 IMG_9849

Thoughts: I love the set. They are perfect for winter when it’s bone chilling cold outside. They are soft, fuzzy, and warm (very warm when it is 85° out!).  I wish the pants were a bit longer, but other than that I have no complaints.  They fit great and feel great.  I do think that the set together is a bit overwhelming to look at. Thankfully I can mix and match these two pieces with other makes to tone them down a bit.

The top I can pair with any of my black leggings.  Seen here with my Apostrophe My Fit leggings. IMG_9855IMG_9856 And the bottoms I can pair with any of my black tops and tanks.  Seen here with my P4P Sweet Tee. IMG_9858IMG_9859

So as a set, I think they are a bit much.  As separates, I like them quite a lot. I will probably make this pattern again some time either in more fleece, or maybe I will try an interlock set.

Thanks for reading!

Kristin

Friday, August 14, 2020

2 pairs of pants–Greenstyle brassies and Burda 11/2007 #122

Let’s start with the easy ones – They turned out almost perfect and are heavenly to wear. Pattern: Burda 11/2007 #122 IMG_9826 Sewn before in Purple space dye and red yoga knit IMG_9825

Date Sewn: July-Aug 2020

My measurements at the time: Waist 32/Hip 46.5

Size used: Waistband 42; Front Piece: 42 waist, 44 hip to hem; Back Piece: 42 waist, graded to 46 at hip to knee and back to 44 the rest of the way to hem. I added 1.5” for the hem like the magazine stated and actually did the 1.5 chunky hem (it’s awesome, I love long pants and a chunky hem).

IMG_9827

Alterations: I scooped the butt curve about 1/2 inch. I changed this pair to an enclosed elastic waist instead of a fold over yoga waist. I feel like it was too hard to keep the French terry from sliding down on this fabric with the yoga band. I used 1.5” elastic and it works great.

Instructions: For Burda, these are good instructions.  However, the pattern is also simple to sew up and not too much to mess up.

IMG_9830

Fabric: A super soft, perfectly weighted gray French terry.  This fabric is amazing.  I think I picked it up at Walmart in one of those $4 for 2 yards rolls that they have now. I can’t remember exactly though. I used 2 yards.

(picture below is where I wear them comfortably.  They are just a tiny bit wrinkled in the inner thigh there)

IMG_9831

(and this picture below is when I pull the waist down about 1/2” to 1” to sit even on my hips. Darn near perfect!)

IMG_9832

Thoughts: Wow. I loved my purple pair of these pants until I painted in them and ruined them.  I still love and wear my red yoga pants in this pattern all the time.  Now I have these gray ones and they are the stuff dreams are made of.  They fit well, almost perfectly.  They are so soft and comfortable to wear; they don’t attract dog hair or fuzzies.  I don’t want to ever take them off!!  In fact, I’ve worn them the past 2 days now! I love everything about them.


Pattern: Greenstyle Brassies IMG_9814

Date Sewn: I’ve been really good about writing down the dates when I sew stuff but I forgot to on these.  I think I started them at least 6 months ago. Then there were too many adjustments so I just stopped sewing them.

IMG_9822

My measurements at the time: Waist 32.5, Hip 47.5

Size used: 3xl hip to 2xl waist and 4xl calf. These are midrise in height, no leg cuffs. My hip was just barely out of the 2XL size and not quite the 3XL size but because of my large rear I chose to sew the larger size of 3XL hip.  Since I wear my pants waists lower than waist level I choose to make a 2XL waist even though my actual waist measures in a size between L and XL.  In hindsight I have zero idea why I chose to make the waist a 2xl since I usually have to size down 2 in the waist. Also, I have big calves that are hyper-extended so I chose the 4xl size by measuring the pattern with my calf measurement.

IMG_9812 Alterations: I had to do a ton of alterations to these, more than I think I have ever done on any pattern before.
  • 3/8” extended at back thigh with back crotch curve
  • 1/2” scooped butt and then scooped another 3/4”!!
  • 1” taken in for sway back and center back
  • 1/2” added to top of back waist at outer hip
  • 1” added to back butt rise at center back hip level sloped to 1/2” at side hip back (a slash and spread for more crotch length)
  • 3/8” added to inner thigh with front crotch curve
  • 1/4” scooped at front crotch – then scooped 1/2” more!
  • then I had to take 1/4” off from hip out seam down to knee, tapering in to 0 at waist and calf. (initially I added 1/4” here but then had to take off 1/2” making it 1/4” in the end)
Fabric:  A black French terry. I used 2 yards; I purchased this 100% cotton French terry from Stylishfabric in July 2017 for $6.90/yard.  It’s a decent French terry I would call medium weight. IMG_9818 Thoughts: I’m ok with how they turned out, but I feel I had to do so many alterations for my shape that it was exhausting.  I’ll wear them awhile to see how they fit. I do like the pockets and how they are sewn down so there is no floppy pocket bag.  The front crotch still has some weirdness going on – it feels too long and I’m not sure if the pattern is intended for a dropped crotch or if my rise is just too long.So they are just ok and not something I love.

(picture below is where I wear them comfortably.  They are wrinkled in the inner thigh there)

IMG_9821

(and this picture below is when I pull the waist down about 1/2” to 1” to sit even on my hips. Better looking than the above but with loose back thighs now)

IMG_9820

Looking at these pictures, I’m thinking that some of my back under butt wrinkles are because I don’t have enough length for my butt (not enough rise). By pulling the pants down and allowing my butt to have the right length most the wrinkles disappear.  I think I will experiment with adding to the rise of the front and back by 1” but then sloping the front down to my comfort spot of way low rise. That will add the length to the back all across (instead of my slash and spread angle I do just at middle of center back curve).

Pants shown with my Ottobre 02/2007 #1 tank top

Thanks for reading!

Kristin

Wednesday, August 12, 2020

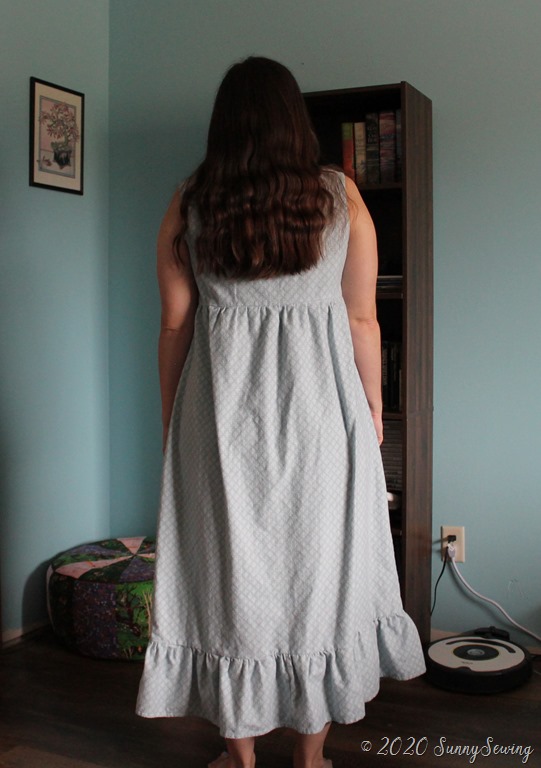
Simplicity 3573 Nightgown

Pattern: Simplicity 3573 Nightgown

IMG_9760

Date Sewn: 08/07/2020

My measurements at the time: High bust 36/Bust 38.5/Waist 32/Hip 46

IMG_9739 IMG_9756

Size used: M for the bust/waist and XL for the hips. My measurements put me into a Large for the bust/waist but Big 4 patterns usually have a ton of ease so I sized down on top by 1 so it wouldn’t be so big. In retrospect, I should have left it at the Large size as it is just a tiny bit too tight when I move my arms forward. So for this pattern, use your correct size

IMG_9764

Alterations: I lengthened the bodice by 1” because the other photos reviews of this looked like the top hit at a weird spot in the middle lower bust and I didn’t want to feel a seam across the lower part of my bust. I’m glad I did add that 1” because I feel like it hits the perfect spot now. I also did my usual 1/2” forward shoulder adjustment and this time I did a 1/2” round back adjustment because my quick tissue fit of the top showed I needed it.

IMG_9761

Instructions: They are good. I read some people having problems with the steps for the top button placket and neck facing sewing. I took step by step pictures of that to show how I interpret the instructions to say how to do it. I will include that below. The pattern states “for interfacing” on the top but doesn't’ say to add any interfacing. Since buttons go there, I did add featherweight fusible interfacing just to that edge. Because I added this interfacing I didn’t need to baste on step 2 to fold it again. The rest of the instructions went just fine.

20200807_115001

Fabric: I actually cut up a king size flannel sheet that I bought last year on clearance to use for pajamas.. Sometimes this is a great way to get a lot of fabric for cheap! I measured all the cut pieces after and see I used 3.5 yards of fabric for this if it was 44” wide. The pattern calls for 3 3/8 yard so this is spot on.

The buttons I used are some from my Grandma. I only have a small jar of her buttons so they are special to me. Actually this whole nightgown reminds me of her. She wore a lot of them in this style. I miss her <3

IMG_9766 Thoughts: I have been wanting to sew this pattern since my 2014 summer sewing plans. I dreamed this nightgown in a flowy swiss dot, but I don’t have any of that in my stash so I thought a nice cozy flannel nightgown would be great. My husband and daughter made fun of me saying this is a tent and not a nightgown. I like it though. I think it will be soft and comfy to wear when fall comes around. It is big and roomy, but the flannel makes it heavier so it is meant to be this way. If I made it in a soft lawn or that swiss dot It would still be flowy but less roomy looking. I do wish there were more ruffling/gathers on the bottom ruffle and where the skirt attaches to the bodice. Other than that I like it a lot! 20200805_161059

Here is how the top is laid out. the farthest right rectangle is the “interfacing” part. Then you have the middle rectangle and a far left line for buttonholes.

20200805_161108

Fold the interfacing far right rectangle to the bottom side.

20200805_161118

Now fold it BACK to the TOP along the other line that says “fold line for facing”; sort of like an accordion. The instructions make it seem like you fold this under and then over but you don’t. You just fold the interfacing back onto the facing. Baste this.

20200805_154454

Now fold open the bias tape and attach it to the neckline overlapping the folded back front placket by about 3/4”. sew along the first fold in that bias tape about 3/8” seam allowance.

20200805_160237

after you sew the bias to the neckline (not sewing over the placket area), fold the bias up like normal bias and then flip it down once so that it doesn’t show on the frontside of the bodice. Then flip the placket back to the right way.

20200805_160255

stuff the bias tape into the placket hole and press the placket over it all nice and flat. (I didn’t make my bias long enough here to go all the way into the placket hole).

20200805_160516

topstitch all around the neckline.

20200805_160523

view from inside.

20200805_160516

view from the outside. I sure hope these steps help someone!

Thanks for reading! Kristin