Wednesday, March 27, 2019

An experiment in how jeans fit - a lesson learned

A short time ago I woke up one morning and did the usual, checked Facebook before even getting out of bed.  I was quite shocked to find a screenshot off MY blog of MY Ginger Jeans posted by someone else.  This person stated that she couldn’t understand why I was so happy with the fit and that they fit terrible.  Some people in the group proceeded to pick apart all the things wrong with my body and my fit.

Totally rude and unacceptable.  I was shocked, hurt, and then angry as hell.  How dare she belittle me and steal my photo.  I typed up a comment stating it was my photo and asked her to take the post down; which she did – or an admin did, I don’t know.  She never apologized and that is the reason I’m still stewing inside over it.  It hurt, and it made me question my sewing, and my body. 

SO, I decided to do a little experiment.  To prove to myself that sewing my own things is something I should continue.   I have 4 pairs of pants in a collage below.  3 are ready to wear, store bought. 1 is self sewn.  They all have their fit issues; the pants do, not my body. My body just needs the pants to be adjusted. Some look good in some areas, some in others; none are perfect.


A different layout to see the fit differences better


Pair 1: Levi’s Curvy Bootcut; size 14.  The waist actually fits pretty nice (shocking since store jeans never fit me in the waist).  The jeans are thin and I feel like they look “bumpy” on my body because they are so thin.  They are ok, the material is not soft like the rest, but it’s not scratchy either. slightly loose.

Pair 2: Lee No Gap Waistband Curvy Fit Bootcut Jeans; size 16. The waist gaps even though it has a built in elastic part.  The elastic waist part makes me feel itchy (allergic to latex and sensory issues).  The fabric is nice, thicker, soft.  I like how they look in the front and side.  I can’t get past the waist. not loose, not tight, I like how they feel in snugness.

Pair 3: Gap Curvy Flare; size 14.  They no longer make these, they are my favorite RTW jeans.  They feel nice when I wear them, but I constantly have to pull them up.  I love the hip hugging and flare, the material is soft. After time they get really baggy in the butt and slightly baggy everywhere.

Pair 4: Ginger Jeans, modified flare; size 12 waist and on the front pant size 14 hip, the back pant 18 hip.  These feel the best on me, like they hug me just right. Are their still fit issues? sure. But I don’t really care to be honest.  The material on these is so soft.  snug and hugging.


The people that I care about, my amazing sewing friends that follow my blog, know I struggle deeply with health issues.  I have certain fit issues I just don't care to address - I put my energy into what I feel is important. 

So to the lady that put my body on blast without my permission – shame on you.

And to everyone else, the real people that matter, I will continue sewing.  I enjoy it even when it hurts, even when it sucks out all my energy.  I love the hobby and I love the community.  I love seeing all the things my sewing friends make!

I learned quite a bit from this experience.  We need to be less critical of our sewing makes.  I am horribly critical when I make something; time for that to change. Ready to wear doesn’t fit perfectly either!  Our sewing makes will almost always fit us better than anything store bought.  And if they don't, well then we learn, change the pattern, and grow from it!  It's still a fun experience. 

(Also, thank you so much Shirley for being such a great friend to me that day; you were there for me when I most needed a friend). 


Onward my sewing friends!

Kristin

Friday, March 15, 2019

Burda 03/2012 #114 Elastic Waist Shorts Muslin

As you may have noticed, I'm playing catch up with blog posting.

Last May (2018) I was determined to make some nice fitting shorts.  I watched a ton of Craftsy Bluprint classes on fitting, read more books, etc.  I picked a simple pattern to start with, Burda 03/2012 #114 Elastic Waist Shorts.  I even put this pattern in my Spring SWAP for 2018.


I did a tissue fitting before cutting out the muslin fabric.  It helped me make a few changes (listed below).  Nothing is hemmed on these, no waistband in; just a quick sew up in the needed places.


This pattern only goes to a 42 so I graded it out to a size 46.  My pattern notes show I lowered the front rise by 1/4" added 1/2" to the width at Center Front and 1/2" to the front thigh.
In the back I added 1/2" wedge to the center butt, rotating this to take out 1" of the bottom leg width.  This created 3/4" addition to the top waist width so I took it out at the side seams of both the outer and inner.  Whew, that sounds confusing but what it amounts to is a sort of full bust adjustment for my butt.  A full butt adjustment!


I think the fit turned out really great.  There are a few tweaks they need here and there. Also, these shorts are super short for what I'm comfortable with but lengthening the legs would take away from the cute design of them.


So after all that work I put them on hold and moved forward with something else.


I really wanted to make these out of some amazing linen blend fabric I have.  I will make them soon I think. Finding these pictures made me want a pair. I will sew up a pair of these just to wear around the house and yard in summer, because I like the style, and darn it - shorts that fit me are hard to find!


~ Happy Sewing! ~ Kristin ~

Monday, March 11, 2019

Jalie 3886 Julia Camisole and Undies


Back in March 2018 I tested the Julia pattern from Jalie. 


Size Used: 
Camisole: U for Shoulder/Bust and grading to Y at hip. 
Undies: Size V at waist to Y at hip.


My Measurements at the time: Bust 36, Waist 29-30, Hip 43


(I would wear a different bra with this top, I took these pictures for testing fit). 

Fabric Used:  Red Cami is double brushed poly; Blue camisole is a soft ITY; Purple undies are from Poly Spandex.  Gray/Teal undies are cotton lycra.  They all met the stretch and recovery requirements.


Alterations: I blended sizes to fit my pear shape.  I do this to all my patterns.  I did not make any other alterations to the pattern


I made View A camisole. View D undies. 

Instructions: Well written, easy to follow for the most part.   However, I was really confused with the strapping in the back with the sliders on the camisole.  I really felt like there should be more explanation on those.  I have never put in sliders before, so I was lost.  The small drawing of the finished slider part was all that was there to help me.  After I made the first one I knew what I was doing so it made more sense. 


Overall fit:  I think the camisole fits great.  I love the swing front and that the back isn’t wide like the front.  On me I think I would reduce the neckline elastic by ½ to 1” because it gaped a little at center neck even while wearing it – with movement. 


The first (purple) undies fit good except that they didn't cover my cheeks at the bottom.  They did not ride up, however I like to have the fabric cover my cheeks, so on the second pair I added about an inch to the width there.  (Normally I add about ½” to undie patterns here so it is not uncommon for me).   The gray pair of undies fit better with alterations but wearing them I found they are really low rise in the back; I need more height there so when I bend over....


 I loved this pattern so much that I had to make a second pair the same day (the blue floral).  It is a very fast sew.  I think it will be perfect not only for bed/sleeping but for hot summer days.


Happy Sewing! 
~ Kristin ~

Thursday, March 7, 2019

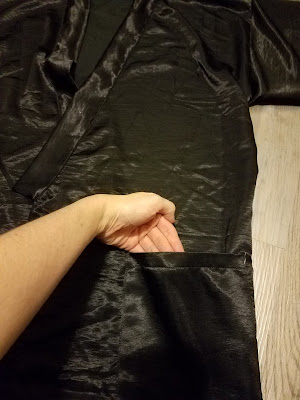
Jalie 3889 Melanie Kimono Robe in Black Satin


Last year (Jan 2018) I was fortunate enough to be pattern testing for Jalie.com
I made this Kimono robe in testing and forgot to post about it.

 Melaine 3889 Kimono Robe


Size Used: V for Shoulder/Bust/Waist, and grading to Y at the hip.
My Measurements at that time: Bust 37, Waist 30, Hip 43


 Fabric Used: A mystery fabric. It is polyester, shiny on one side with striations in the fabric and matte on the other. It is soft and silky feeling. My sewing peers guessed it might be Polyester Dupioni. I’m not sure what it is, except that it’s slipper and polyester.  I got it when Hancock was going out of business.  I have 10 freaking yards of this stuff and it was only like $0.10/yard. lol. (Hancock label calls it "Dull satin").


Alterations: I only blended from size V on top to Y at the hips to fit my pear shape. I do this to all my patterns.


Instructions: Well written, easy to follow. I thought this would be harder to sew, but the instructions made it easy.


Overall fit: I think the fit is spot on. I was happy to find it fit over my hips when closed, an issue I have frequently.


Issues: I didn’t have any issues in making this. I starched my slippery fabric and used glue stick to help hold hems and seams. I also used a bit of stabilizer when starting to sew my seams from an edge. This ripped off easily when I was done. It sewed together nicely.


In testing I found these issues, however, they may have been addressed and changed before the pattern released:
  • Belt loops too long and wide.  I would be more comfortabble with 3/4 the length of them and 1/2 the width.
  • The belt was too long – like 6 inches too long.
  • The neckband would be easier to sew on if it had marks to help align it better.

This is one of those patterns I would put on my list of things I want to make and then never get to it for fear it would be too hard or take too long. I love the robe and found it wasn’t very hard at all. It took me about 4-5 hours of straight sewing so it wasn’t too long either.


Happy Sewing!
Kristin