I loved the yellow summery dress I made yesterday from this pattern and I had to try it as a nightgown. Ottobre 03/2012 #34 Jungle Stripes dress. Also, Miss K completed her first project and that is how I tricked her into modeling the nightgown ;-)
This pattern is a dream and works well for a nightgown as well as a dress. It has an elastic neckline and sleeves for a peasant dress feel. This fabric was notably more stretchy and thin so it was a little harder to work with. Once I attached my walking foot everything went smoothly.
This fabric was actually part of my very first fabric.com order back on Jan 23, 2012. Thermal Knit Apples Pink/Red. I used 1.50 yards, $4.05 total.
Miss K made her pillow mostly by herself. I cut the fabric with my rotary blade (she is not allowed to touch that scary thing) and assisted with the zipper but she did all the actual sewing. She is so proud of herself and so am I :) She made it just like in my tutorial.
The fabric has a bit of a stretch. I'm thinking a cotton sateen with lycra? It has a nice sheen. My mom had it leftover from a summer dress and she likes to give me her leftovers, lol.
~ Happy Sewing! ~ Kristin ~
Showing posts with label home decor. Show all posts
Sunday, July 14, 2013
Wednesday, May 29, 2013
New Living Room Pillows! ~ Link to Tutorial
Something about new pillows makes a room feel fresh. Back in September of 2012 I made these awesomely easy zippered throw pillows and provided you with a tutorial.
The pillows were cute but a little on the small side. P.S. I still have all four, they will just be moved to the "banana couch" for now. ("banana couch" is an amazing 70's tan couch that I think they called kidney shaped? I don't know for sure but I've always loved it so when we bought my grandma's house 3 years ago I made sure the couch came with it!)
This time around I used 18x18 inch pillow forms - bought on sale at Hancock's. I followed the same steps as the tutorial and these really are so super easy to make.
I love the outcome and the pillows are huge! I can't wait for everyone to get home and find them.
The fabric I purchased on Feb. 8th this year - yikes it took me this long to sew them up!
The green is a wonderful print from Valori Wells - Wrenly Bloom Citrus 1.5 yards (had leftovers)
The brown is a great print from Ty Pennington Home Decor Impressions - Lace Espresso 1.5 yards (had leftovers)
Breakdown:
18x18inch pillow forms (4): $31.00
1.5 yards Wrenly Bloom Citrus: $11.45
1.5 yards Lace Espresso: $9.55
Total for all four pillows: $52 or $13 each
The best things about these are the fact that: I can remove the cover to wash them, and now that I have the forms I can also remove the covers and change them up to new fabrics with ease.
~ Happy Sewing! ~ Kristin ~
The pillows were cute but a little on the small side. P.S. I still have all four, they will just be moved to the "banana couch" for now. ("banana couch" is an amazing 70's tan couch that I think they called kidney shaped? I don't know for sure but I've always loved it so when we bought my grandma's house 3 years ago I made sure the couch came with it!)
This time around I used 18x18 inch pillow forms - bought on sale at Hancock's. I followed the same steps as the tutorial and these really are so super easy to make.
I love the outcome and the pillows are huge! I can't wait for everyone to get home and find them.
The fabric I purchased on Feb. 8th this year - yikes it took me this long to sew them up!
The green is a wonderful print from Valori Wells - Wrenly Bloom Citrus 1.5 yards (had leftovers)
The brown is a great print from Ty Pennington Home Decor Impressions - Lace Espresso 1.5 yards (had leftovers)
Breakdown:
18x18inch pillow forms (4): $31.00
1.5 yards Wrenly Bloom Citrus: $11.45
1.5 yards Lace Espresso: $9.55
Total for all four pillows: $52 or $13 each
The best things about these are the fact that: I can remove the cover to wash them, and now that I have the forms I can also remove the covers and change them up to new fabrics with ease.
~ Happy Sewing! ~ Kristin ~
Thursday, September 6, 2012
Awesomely Easy Zippered Throw Pillow ~ Tutorial
(pillows above I made after this tutorial was created - you can find them here)
I love pillows. They are fun to look at and decorate with as well as practical.
My kids love pillows. They are great to throw around as well as build forts with.
My husband loves pillows. They are great for his feet to prop up on as well as his head.
Who doesn't love pillows? We needed more in our house so I set out to make some fast pillows.
We also have really bad allergies and asthma in my house (plus messy kids) so I needed them to be easy to wash as well.
Living Room received soft suede green and fun chocolate rosette!
Miss K's Room received purple super soft minkee
I love how fast they were to make and how they all turned out! The kids have man(or should I say kid) handled them all already. They have even been outside in a huge cardboard box as ship pillows and on the trampoline..... sigh.
Want to make some of your own? Here's how!
Awesomely Easy Zippered Throw Pillow ~ Tutorial
Supplies Needed for 2 pillows 14 x 14 inches in size:
- 2 14 inch zippers
- 1/2 yard of fabric cut into four squares of 14 x 14*
- 2 pillow inserts 14 x 14
- matching thread
- pins
- something to mark fabric with
- ruler
Let's Get Started:
1. Place 2 squares right sides together and find where you want the bottom of the pillow to be. Then pin both squares together. Using ruler mark 2 inches in on both sides of bottom of pillow as shown below. (Ignore sew, backstitch, baste until step 2).
2. At the sewing machine you will do the following ONLY to the bottom side you pinned and marked. Sew to first mark. Backstitch. BASTE across big spot to the next mark. Backstitch. Sew to the end of the bottom. See picture above. I used 1/2 inch seam allowance for all of pillow.
3. Putting in the zipper. Open the two squares right sides down on a table so that they are flat like below. Finger press or Iron open seam you just made. Lay zipper on top of this seam. See second picture before pinning!
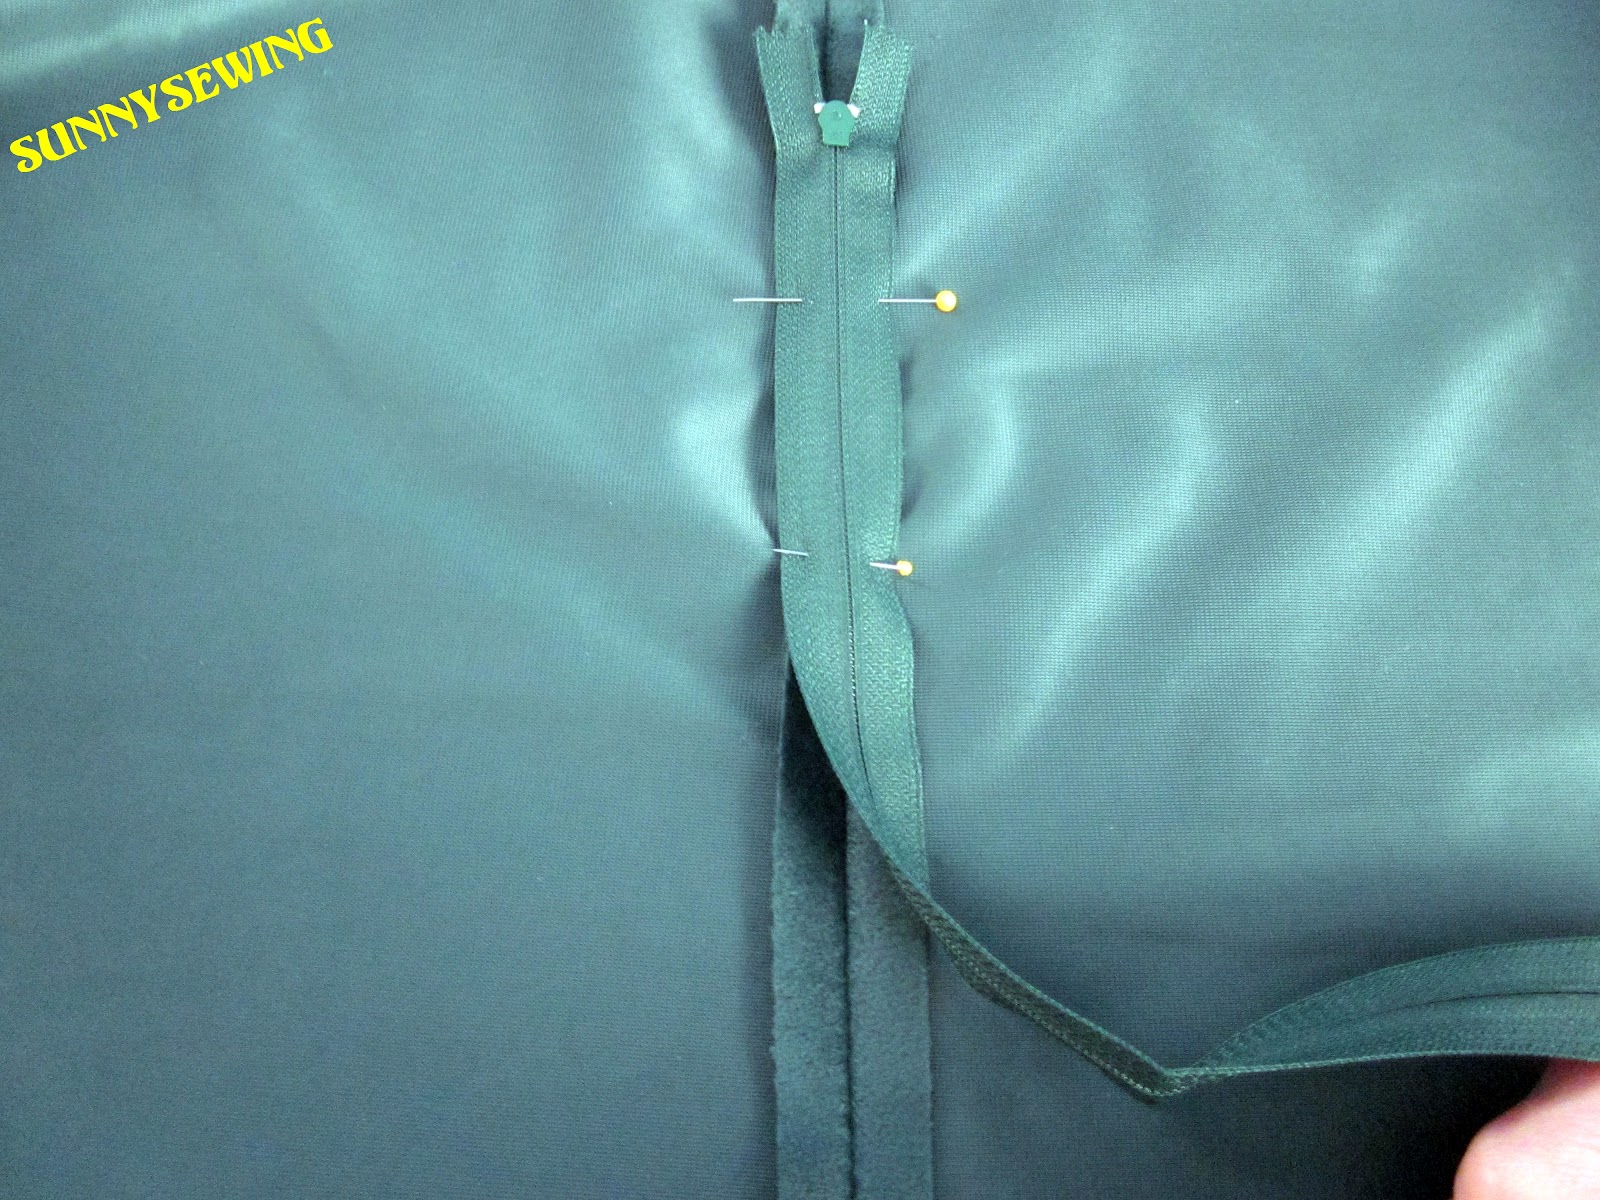
4. You need to make sure zipper teeth are lining up in the exact center of the seam you made as seen below. Pin carefully and make sure the fabric is not jumbling up when pinning. You want the seam side to be flat while you sew. Also, you want to make sure your first pin is where the 2 inch mark you made was. Then the last pin is where the other 2 inch mark you made was. This is were you will go ACROSS the zipper when sewing around it.
After you pin in place it should be like the below picture:
5. Use zipper foot to sew around the entire zipper. Go slowly and carefully especially when going by the zipper pull. I like to sew close to it, then stop and lift my zipper foot up to pull the zipper back where I already sewed, put foot back down and proceed. It is not always easy to move that stinking zipper! :-) Also, I stitched and backstitched 3 times over the ends of the zipper to make sure they were secure.
When finished going around it should look like the below, when opened flat (right sides up)
6. Very carefully seam rip the basted part. It is the middle of the rectangle you just sewed around the zipper. See below.
When all is seam ripped, open the zipper.
7. The home stretch! Leave zipper OPEN! at least part-way. place right sides of pillow together and pin.
8. Sew around the remaining 3 sides with 1/2 inch seam allowance. Then clip corners (seen below).
9. Turn pillow right side out through the zippered opening and poke out corners.
10. Stuff pillow insert into pillow shell with the zipper being on the bottom. YAY! Your pillow is complete!
I love that this looks like a mouth!!
Now go on and make another, or 2 or 4 or 6! I even upcycled an old tee shirt to make one of these :-D
Like the fabric? Want to get some? Click the pictures below to go right to the exact fabric at Fabric.com
Remember: You only need 1/2 yard for 2 pillows in 14 inches!
Plush Suede Hunter Rosette Chocolate Lavender Minky
**Price listed is at time of post**Purple checkerboard Minkee is no longer offered**
~ Happy Sewing! ~ Kristin ~
Friday, June 22, 2012
Hawaiian plastic bag holder
I've had this cute Hawaiian fabric for a couple months now and wasn't sure what I wanted to do with it. I decided yesterday that I would make it into an adorable kitchen plastic bag holder. There is a nice pineapple in the middle of the bag and I think that fits perfectly with a kitchen as the pineapple means hospitality.
I finished her up last night and popped her into the Etsy shop. Let's hope she finds a nice home soon.
Happy Friday everyone!
I finished her up last night and popped her into the Etsy shop. Let's hope she finds a nice home soon.
Happy Friday everyone!
Saturday, June 2, 2012
Weekly Sewing Recap
I haven't posted daily this week of my projects because, well, I was busy sewing! :-) Mix that in with my kids last week of school and things were crazy around here. Mr. T has left with grandma and grandpa for three long weeks to be out west. I know he is having fun but mom is sure missing him! Miss K misses him too and she has been very clingy - and super full of energy.
So here is a bit of what I've been able to get done this week.
From the top: Skirt I made for myself from some amazing fabric I couldn't leave at Hobby Lobby! Tunic dress for an 18 inch doll. Mushroom, green and brown grocery bag holder. 2 skirts for an 18 inch doll. I've also been working on my tank top pattern; it's coming along nicely and I have the muslin just about perfect. I think I will sew it up tomorrow with my fabric and hopefully get it up on here. (I also realized Miss K really needs PJ's so I'll be doing some of those next week).
I hope you all had a great sewing week!
So here is a bit of what I've been able to get done this week.
From the top: Skirt I made for myself from some amazing fabric I couldn't leave at Hobby Lobby! Tunic dress for an 18 inch doll. Mushroom, green and brown grocery bag holder. 2 skirts for an 18 inch doll. I've also been working on my tank top pattern; it's coming along nicely and I have the muslin just about perfect. I think I will sew it up tomorrow with my fabric and hopefully get it up on here. (I also realized Miss K really needs PJ's so I'll be doing some of those next week).
I hope you all had a great sewing week!
Tuesday, May 8, 2012
Pokemon Mini Backpack for Mr. T (upcycle)
I won an award today for being the coolest mom ever :)
Mr. T has a class trip in the next few weeks and he can't take a backpack with him. He also informed me that he would need a camera, mp3 player for the long bus ride and money. He also said he wouldn't care a "murse" his words exactly. How a 9 year old knows what a "murse" consists of is beyond me. Anyway we scoured the patterns and found this Kwik Sew 2379 for mini backpacks. Mr. T was pumped when I said I could use one of his old Pokemon shirts to make him a Pokemon bag. (BONUS! Upcycling one of his favorite old tees!) I got all the supplies and had this puppy done in no time. It was really fun to make it and the directions were super easy. Mr. T is stoked and I'm happy he will have a holder for his stuff (as he tends to forget lots of things). I think it turned out better than I had hoped.
The eyelets were a breeze too (my first time using them).
Fabric of blue check and orange lining I picked up at Hancock, it is cotton duck; parachute strap clips, webbing, and drawstring I picked up there as well. Eyelets I found at Wal-mart and the fun tool to put them together (I asked the store clerk where the "wacking thing" was for eyelets. She laughed at me.) The only thing I would change in retrospect would be a magnetic snap on the front bottom pocket. The pattern called for no closure and with a little boy..... bad things are bound to happen with that. I see a snap on the picture and on the pattern drawing but I didn't' see it in the instructions (unless I really overlooked it).
Mr. T has a class trip in the next few weeks and he can't take a backpack with him. He also informed me that he would need a camera, mp3 player for the long bus ride and money. He also said he wouldn't care a "murse" his words exactly. How a 9 year old knows what a "murse" consists of is beyond me. Anyway we scoured the patterns and found this Kwik Sew 2379 for mini backpacks. Mr. T was pumped when I said I could use one of his old Pokemon shirts to make him a Pokemon bag. (BONUS! Upcycling one of his favorite old tees!) I got all the supplies and had this puppy done in no time. It was really fun to make it and the directions were super easy. Mr. T is stoked and I'm happy he will have a holder for his stuff (as he tends to forget lots of things). I think it turned out better than I had hoped.
The eyelets were a breeze too (my first time using them).
Fabric of blue check and orange lining I picked up at Hancock, it is cotton duck; parachute strap clips, webbing, and drawstring I picked up there as well. Eyelets I found at Wal-mart and the fun tool to put them together (I asked the store clerk where the "wacking thing" was for eyelets. She laughed at me.) The only thing I would change in retrospect would be a magnetic snap on the front bottom pocket. The pattern called for no closure and with a little boy..... bad things are bound to happen with that. I see a snap on the picture and on the pattern drawing but I didn't' see it in the instructions (unless I really overlooked it).
Sunday, April 29, 2012
Feather Your Nest Challenge - Tee to pillow
All week I've been wanting to do something for the Feather Your Nest Challenge over at Stumbles & Stitches; I just couldn't figure out what I wanted to do. I've been trying to decorate my living room in a woodsy, whimsical, owl-y theme and I couldn't find any pillows I liked to match it. I remembered an old T shirt of mine that I loved and wanted something similar for the living room. Then I realized, why not make the shirt into a pillow! It took me a little bit to find where and how I wanted to cut it, and place the zipper into it. But I like the end result, it fits my living room perfectly! (sorry for the 1/2 pic of the actual tee, it was the only picture I could find of me wearing it... back in 2008).
Wednesday, April 11, 2012
How to Make Skinny Curtain Ties (with Velcro)
2. Cut out two rectangles out of your fabric. I used a width of 4 which gave me a finished width of 1 inch. The length I came up with was 11 inches (which is 10 inches in finished width).
3. Press both flat.
5. Fold 1/2 inch in on both 4 inch ends and sew (like making a hem-- you can choose to skip the sewing of this part if you do not want the extra lines on the box pattern for the velcro. I liked the pattern it made. If skipping, simply press 1/2 inch in on both of the ends and then fold and topstich)
6. Then fold each rectangle in half(bringing long sides together) as shown below so that you have a long strip; Press
7. Open what you have just pressed above and fold in the top side to the middle line (that you made by pressing) and then the bottom side to the middle line you made as shown below. Press
8. Next fold top to bottom and topstich all the way around the entire strip.
9. Place a piece of Velcro on top side of one piece and the alternating bottom side of the same piece. This way when wrapped around the Velcro meets each other as shown below. sew around entire piece of Velcro
11. Hang on curtains as shown below! See that wasn't so hard! Now since they are Velcro they hold tight and you can make as many as you want to change them out!
To keep them secured when not in use I used a piece of the soft fuzzy circle Velcro that adheres to fabric with no sewing. I placed this soft fuzzy circle on the backside of my curtain and then I just hang the one sticky piece of Velcro to that each night. They stay behind the curtain and thus are not visible! :) Enjoy!
Subscribe to:
Posts (Atom)